URL Shortener with Django (Part 5) - Working with Templates and finishing up
Create folder ’templates’ inside ‘shortenersite’ and then inside ’templates’ create folder ‘shortenersite’.
Inside “shortenersite/templates/shortenersite/” create ‘base.html’ and ‘index.html’. So now paste the following to them.
[shortenersite/templates/shortenersite/base.html]
{% raw %}
<!DOCTYPE html>
<html>
<head>
 <title>{% block title %}Welcome to mysite{% endblock %}</title>
 {% load staticfiles %}
 <link rel="stylesheet" href="https://maxcdn.bootstrapcdn.com/bootstrap/3.3.1/css/bootstrap.min.css">
 <link rel="stylesheet" type="text/css" href="{% static 'shortenersite/css/custom.css' %}" />
 <script src="//ajax.googleapis.com/ajax/libs/jquery/1.9.1/jquery.min.js"></script>
 <meta name="viewport" content="width=device-width, initial-scale=1">
</head>
<script type="text/javascript">
 $(function() {
 $('#submitButton').click(function() {
 $.ajax({
 type: "POST",
 url: "/makeshort/",
 data: {
 'url' : $('#url').val(),
 'csrfmiddlewaretoken' : $("input[name=csrfmiddlewaretoken]").val()
 },
 success: returnSuccess,
 dataType: 'json'
 });
 });
});

function returnSuccess(data, textStatus, jqXHR) {
 if(data.url) {
 $('#url-result').text(data.url);
 $('#url').val("");
 } else {
 $('#url-result').text("Do not submit blank.");
 }

}
</script>
<body>
<div id="wrap">
<header>
 <h1><a href="{% url 'shortenersite:home' %}">URL Shortner</a><small>Shorten the URL</small></h1>
</header>

<div id="content">
{% block content %}

{% endblock %}
</div>
</div>
</body>
</html>
{% endraw %}
We are using twitter bootstrap for making our site beautiful and jQuery for making POST request.
[shortenersite/templates/shortenersite/index.html]
{% raw %}
{% extends "shortenersite/base.html" %}

{% block title %}URL Shortner - Make your URL shorter!{% endblock %}

{% block content %}

<div class="panel panel-default">
 <div class="panel-body">
 <div class="col-sm-9">
 <input type="text" name="url" id="url" class="form-control input-sm" placeholder="http://www.facebook.com" />
 </div>
 <div class="col-sm-3">
 {% csrf_token %}
 <button id="submitButton" class="btn btn-primary">Submit</button></p>
 </div>
 </div>
 <div class="panel-footer"><span id="url-result">Enter the URL above and click submit!</span></div>
</div>
{% endblock %}
{% endraw %}
Now let us add static files. Similarly as above create ‘static’ folder inside ‘shortenersite’ and inside ‘static’ create ‘shortenersite’ and inside it create folder ‘css’. Now create ‘custom.css’ inside ‘static/shortenersite/css/’ and add the following code to it:
[shortenersite/static/shortenersite/css/custom.css]
#content {
margin-top: 20px;
margin-bottom: 60px;
}

a:hover{
text-decoration: none;
}

header {
border-bottom: 1px solid #eeeeee;
margin-bottom: 30px;
padding-bottom: 10px;
clear: both;
}

#wrap {
max-width: 700px;
margin: 5px 10px 10px 10px;
padding: 10px;
text-align: left;
}
#url-result {
color: #00e000;
display: hidden;
}
So now we are done creating our URL Shortener with django. Run the django app and visit localhost:8000/ in browser then the final result will look something like this:
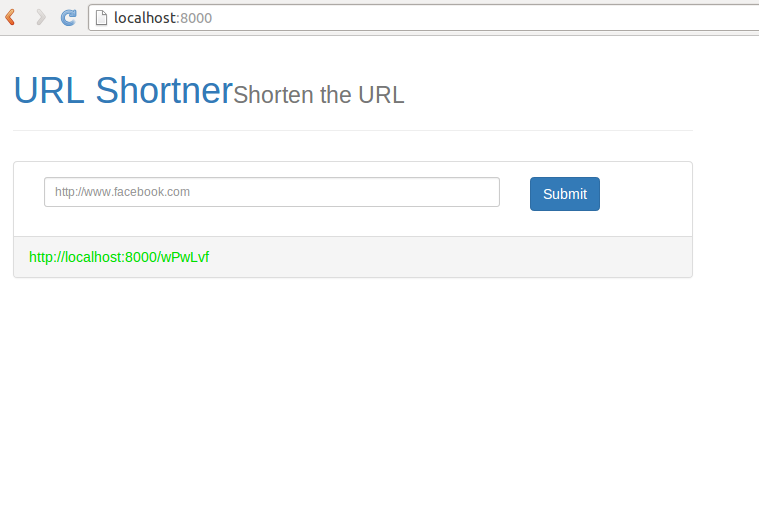
Now you can enter some URLs and click submit and then it should return the short URL. You can visit the short URL and it will redirect to your original URL. Go and see the admin panel, select the URLss and you will see the URLs are added there and also the count will increase if you visit the short URL.
That’s all for this tutorial. Hope everything works fine here.
Post Series:
Part 1: Create a virtual environment and install Django
Part 2: Create a new project and make sure it works
Part 3: Create Django App, Model for our App and work with Django Admin
Part 4: Working with URLs and Views