URL Shortener with Django (Part 3) - Creating django app and model
Now, Let us create a Django app. From your project’s root directory run this command
django-admin startapp shortenersite
This will create a new folder ‘shortenersite’ inside our root directory which is actually a Django app. You can see the following files and folder inside shortenersite:
-
migrations - Contains database migration file.
-
admin.py - We will use this file to configure Django Admin settings for this app.
-
models.py - Contains the model (generally model.py deals with database.)
-
view.py - Used to create views.
-
tests.py - Contains the test suite for our app but we will not be using this file in our tutorial.
Now add this app to our project. Open up “urlshortener/settings.py” file and add ‘shortenersite’ to INSTALLED_APPS. So now the INSTALLED_APPS will look something like this.
[urlshortener/settings.py]
# Application definition

INSTALLED_APPS = (
    'django.contrib.admin',
    'django.contrib.auth',
    'django.contrib.contenttypes',
    'django.contrib.sessions',
    'django.contrib.messages',
    'django.contrib.staticfiles',
    'shortenersite',
)
Now let us work in our models.py. Open up “shortenersite/models.py” and add the following code to it.
[shortenersite/models.py]
from django.db import models

# Create your models here.
class Urls(models.Model):
    short_id = models.SlugField(max_length=6,primary_key=True)
    httpurl = models.URLField(max_length=200)
    pub_date = models.DateTimeField(auto_now=True)
    count = models.IntegerField(default=0)

def __str__(self):
    return self.httpurl
What we just did?
We created table named ‘Urls’ in our database with the following field:
-
short_id (it will store short URL id), (It is of max_length 6 and it is a primary key)
-
httpurl (it will store URL), (It is of max_length 200)
-
pub_date (It will store the date and time)
-
count (It will store the number of times the URL is visited)
Run this command to make changes to database.
python manage.py makemigrations
python manage.py migrate
We just updated our database. We are using sqlite3 which is set up by default for us. So, we do not need to configure anything regarding database settings for now, but if you want to use other database rather then sqlite3 then you can change DATABASES option in “urlshortener/settings.py”.
Now let us add this model to Django admin.
But before that let us be sure that you do not have comment in the following line in “urlshortener/urls.py”.
[urlshortener/urls.py]
url(r'^admin/', include(admin.site.urls)),
Open your “shortenersite/admin.py” And add the following:
[shortenersite/admin.py]
from django.contrib import admin
from shortenersite.models import Urls
# Register your models here.

class UrlsAdmin(admin.ModelAdmin):
    list_display = ('short_id','httpurl','pub_date', 'count')
    ordering = ('-pub_date',)

admin.site.register(Urls, UrlsAdmin) # Register the Urls model with UrlsAdmin options
Simply the above code registers the Urls model we created above to Django Admin.
Run the Django project with
python manage.py runserver
and Open up
http://localhost:8000/admin/
Enter your Login details i.e the credentials of superuser that you have created before. Now you should see something like this.
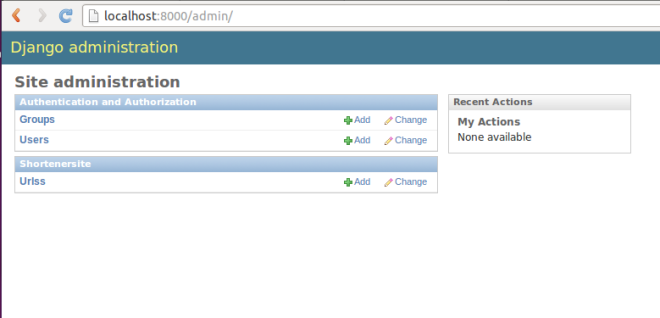
We have Urlss(Model name in plural form) under Shortenersite(App Name). I hope you understand this. Django admin is one of the beautiful feature i like most about Django. And i am sure you will also feel same about Django admin.
Open up Urlss and you can add Urls by clicking Add urls. You can see the fields like Short id, Httpurl and count that we have created. DateTime is added automatically so, you do not have to worry about it.
Alright, This is the end of the Part 3, and we have created app, models for our app and registered the model to see it in Django Admin.
Till now we have just done the Back-end, In the next two tutorials we will be working on Front-end. We will build web app from where user can input the URLs and will get the short URL for his URL.
Post Series:
Part 1: Create a virtual environment and install Django
Part 2: Create a new project and make sure it works
Part 3: Create Django App, Model for our App and work with Django Admin
Part 4: Working with URLs and Views